Hey there! As a supplier of butt weld reducer tees, I get tons of questions about how to install these handy fittings. Today, I'm gonna walk you through the whole process, step by step. So, whether you're a DIY enthusiast or a professional plumber, this guide will help you install a butt weld reducer tee like a pro.
What is a Butt Weld Reducer Tee?
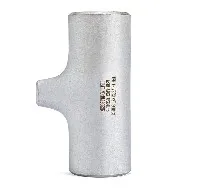
Before we dive into the installation process, let's quickly go over what a butt weld reducer tee is. A butt weld reducer tee is a type of pipe fitting that's used to connect three pipes together at a T-junction. It has a main run and two branches, and the branches can have different diameters from the main run. That's where the "reducer" part comes in – it allows for a smooth transition between pipes of different sizes.
These tees are commonly made from materials like stainless steel, carbon steel, and alloy steel. They're used in a wide range of industries, including oil and gas, chemical processing, and water treatment, because they can handle high-pressure and high-temperature applications.
Tools and Materials You'll Need
To install a butt weld reducer tee, you'll need a few tools and materials. Here's a quick list:
- Butt weld reducer tee: Make sure you get the right size and material for your project. You can check out our 316 Stainless Steel Pipe Tee or Stainless Steel Tee options if you're looking for high-quality stainless steel tees.
- Pipes: The pipes you're connecting should be the right size and material to match the tee.
- Welding machine: You'll need a welding machine that's suitable for the type of material you're working with.
- Safety equipment: Welding can be dangerous, so make sure you have safety glasses, gloves, a welding helmet, and a fire extinguisher on hand.
- Measuring tools: A tape measure and a level will help you ensure that everything is properly aligned.
- Cleaning tools: You'll need a wire brush and some solvent to clean the surfaces of the tee and the pipes before welding.
Step-by-Step Installation Process
Step 1: Prepare the Pipes and the Tee
The first step is to prepare the pipes and the tee for welding. Start by measuring and cutting the pipes to the right length. Make sure the ends of the pipes are square and free of any burrs or debris. You can use a pipe cutter or a hacksaw to cut the pipes, and then use a file or a deburring tool to smooth the edges.
Next, clean the surfaces of the pipes and the tee. Use a wire brush to remove any rust, dirt, or oil from the areas where you'll be welding. Then, wipe the surfaces with a solvent to remove any remaining contaminants. Cleaning the surfaces is crucial because it ensures a good weld and helps prevent corrosion.
Step 2: Position the Tee
Once the pipes and the tee are clean, it's time to position the tee. Place the tee at the desired location on the main pipe, making sure it's centered and aligned properly. Use a level to check that the tee is straight and level. You can also use clamps to hold the tee in place while you're welding.
If you're installing a reducer tee, make sure the smaller branch is positioned correctly. The reducer part of the tee should be facing the direction where the smaller pipe will be connected.
Step 3: Tack Weld the Tee
Before you start the full weld, it's a good idea to tack weld the tee in place. Tack welding involves making small, temporary welds at intervals around the joint to hold the tee and the pipes together. This helps prevent the tee from shifting or moving during the full welding process.
To tack weld the tee, set your welding machine to the appropriate settings for the material you're working with. Then, make a series of small welds around the joint, evenly spaced about 1 to 2 inches apart. Make sure the tack welds are strong enough to hold the tee in place, but not so large that they interfere with the full welding process.
Step 4: Weld the Joint
Once the tee is tack welded in place, it's time to make the full weld. Start by welding one side of the joint, following the appropriate welding technique for the material you're using. For most stainless steel pipes, you'll want to use a TIG (tungsten inert gas) welding process, which provides a high-quality, clean weld.
When welding, make sure you maintain a consistent arc length and travel speed. Move the welding torch in a smooth, circular motion to ensure that the weld is even and uniform. Weld all the way around the joint, making sure to fill in any gaps or voids.
After you've completed one side of the joint, flip the tee over and repeat the process on the other side. Make sure the second weld is aligned with the first weld and that the joint is fully fused.
Step 5: Inspect the Weld
Once the weld is complete, it's important to inspect it for any defects or imperfections. Look for cracks, porosity, or other signs of a poor weld. You can use a magnifying glass or a non-destructive testing method, such as ultrasonic testing or X-ray testing, to check the quality of the weld.
If you find any defects, you'll need to repair the weld before proceeding. This may involve grinding out the defective area and rewelding it.
Step 6: Clean and Finish the Weld
After the weld has been inspected and approved, it's time to clean and finish the weld. Use a wire brush or a grinder to remove any slag or spatter from the surface of the weld. Then, smooth the weld with a file or a sanding disc to give it a finished appearance.
Finally, apply a corrosion-resistant coating to the weld to protect it from rust and other forms of corrosion. This will help extend the lifespan of the fitting and ensure that it performs properly over time.
Tips for a Successful Installation
- Follow the manufacturer's instructions: Make sure you read and follow the manufacturer's instructions for the butt weld reducer tee and the welding equipment you're using. This will help ensure a safe and successful installation.
- Practice your welding skills: If you're new to welding, it's a good idea to practice on some scrap pieces of pipe before you start working on the actual installation. This will help you get comfortable with the welding process and improve your technique.
- Work in a well-ventilated area: Welding produces fumes and gases that can be harmful to your health. Make sure you work in a well-ventilated area or use a ventilation system to remove the fumes from the workspace.
- Take your time: Installing a butt weld reducer tee is a precise process that requires patience and attention to detail. Don't rush the job, and make sure you take the time to do it right.
Why Choose Our Butt Weld Reducer Tees?
As a trusted supplier of butt weld reducer tees, we offer high-quality products that are made to meet the highest industry standards. Our Stainless Steel Reducer Tee options are available in a variety of sizes and materials, so you can find the perfect fitting for your project.
We also provide excellent customer service and support. Our team of experts is always available to answer your questions and help you find the right products for your needs. Whether you're a small contractor or a large industrial company, we can provide you with the products and services you need to get the job done right.
Contact Us for Your Procurement Needs
If you're interested in purchasing our butt weld reducer tees or have any questions about the installation process, don't hesitate to get in touch with us. We're here to help you with all your pipe fitting needs and ensure that you have a successful project.
So, what are you waiting for? Contact us today to start your procurement process and experience the difference our high-quality products and excellent customer service can make.


References
- ASME B16.9 - Factory-Made Wrought Buttwelding Fittings
- AWS D1.1/D1.1M:2020 - Structural Welding Code - Steel